buat semua yg celebrate christmas..
Friday, December 23, 2011
Malam Cinta Seni UTM 2011
haloo...lmbt sngt post nie..tp happy sngt dpat pergi malam cinta seni utm...tp motif utama adalah fynn jamal..hehe...dpat jmpe kak fynn untk kali ke 3 dlam thun nie...gmbira sngt...yg 1 mase earth hour..tahu x ape tu??..ala yg ttup lampu selama 1jam tu..tahu kn..tu first time jmpe kak fynn....mase tu dgn xbwak kamera,handphone..pergi mcm tu jer..gementar sngt time tu..hehe...lpas hbs event pg jmpe kak fynn..kjap jer jmpe kak fynn..hehe...sgan gler.....xdpat nk amik gmbr dgn kak fynn...yang ke 2 plak mase GEGO..post lpas ader post..kali nie dpat amik gmbr..happy sngt..hehe..yg ke 3 nie dkat utm..dlam gmbira jmpe kak fynn..sedih sbb dier da nk pg russia blik..kerja dkat sna..tp kali nie dpat jmpe laki kak fynn,abg tri..dier sama ramah mcm kak fynn jgk..kali nie best sbb dpat tgk kak fynn dgn abg tri perform same2..tp mase ikut kak fynn pg dduk kt khemah..dduk blkg kak fynn..sbelah tu ader fami.tt,ader kd.tu la first time jmpe dorang..tp fami da jmpe mase dkat gego..so da knal sket la..hehe..pastu jmpe aisyah dier yg amik kn gmbr yg mase kat gego tu..kalo x,xder la gmbr dgn kak fynn..jmpe kell..sblum nie tahu dorang kat fb jer..so gmbira sngat la dpat jmpe kak fynn sblum dier pergi russia..
Labels:
fynn jamal,
joho,
malam cinta seni utm
Saturday, September 24, 2011
please like ramai2 ok..
https://www.facebook.com/radioOHmedia#!/photo.php?fbid=267786616576067&set=o.215396028495150&type=1&theater
https://www.facebook.com/radioOHmedia#!/photo.php?fbid=267786616576067&set=o.215396028495150&type=1&theater
Friday, September 23, 2011
Gego 2011
Akhirnya dapat juga bergambar dgn kak fynn (fynn jamal)..gmbira sangat2..seorang yg ckup unik,selalu memberi jiwa kepada setiap yg memerlukan..semoga kak fynn selalu suksess..thanks JOHO sbb invite kak fynn perform..kalo x mmg xdpat la nk jmpe dgn kak fynn..
Sunday, August 07, 2011
SELAMAT MENYAMBUT RAMADHAN AL MUBARAK
Semoga kedatangan ramadhan kali ini membawa seribu makna kepada kita semua...ramadhan bulan yang sangat diberkati...semoga kita semua dapat mencari ape yang dicari....selamat berpuasa ye semua..
Thursday, February 17, 2011
BROADBAND
seperti yang kita semua tahu..BROADBAND menghubungkan internet..sekarang ini macam2 promosi BROADBAND yang dibuat..contohnya klik sini http://www.celcom.com.my/broadband/promotions_cny.php..dan sini http://www.maxis.com.my/personal/broadband/tss/index.asp...sini juga http://www.digi.com.my/internet/broadband/packages_contractfree.html....cuba lihat...semua bnyk 5gb sahaja untuk downloads....rasenya cukup ker??5gb tu termasuk online facebook hari-hari,lihat video di youtube tidak termasuk downloads lagi,lagu mp3 lagi mahu downloads,melayari internet mencari bahan untuk buat assignment...cuba la fikir2kan ye..lagi satu BROADBAND nie kalo penggunaan sudah melebihi had 5gb,kelajuan internet kita akan berkurangan..ader kes dimana seorang datang bertanya kenapa internet dier sudah perlahan...lpas tu selepas bertanya,katanya setiap hari melihat video dekat youtube..itu la puncanya internet menjadi perlahan...kekurangan BROADBAND ini lagi adalah terlalu sedikit penggunaan untuk downloads..adakah anda tahu bila kita melihat video di youtube,melayari internet,downloads lagu dan movie,ataupun yang berkaitan internet ini..ape sahaja yang kita buat..semuanya termasuk dalam 5gb itu...pada saya memang la tidak ckup...terlalu sedikit...tp mungkin untk mereka yang cuma melayari internet sahaja tanpa downloads lagu dan movies..pasti akan cukup..tapi bagaimana pula dengan mereka yang setiap hari melihat video di youtube dan downloads..pasti tidak cukup...tp kelebihan BROADBAND pula adalah mudah alih dan senang dibawa ke mana sahaja...tp kita lihat pula streamyx..sini http://www.streamyx.com/get_streamyx/get_streamyx.php?id=getstreamyx_package_standard....kelajuan memang berbeza,xada lagi lame sangat tngu nk loading...dan streamyx adalah unlimited..so anda semua boleh online facebook hari-hari,lihat video di youtube siap downloads lagi,lagu mp3 bole downloads,melayari internet mencari bahan untuk buat assignment.itu semua anda bole buat tanpa rasa risau lagi...kelajuan tidak akan berkurangan macam BROADBAND...tetapi kekurangan adalah boleh di rumah sahaja...tidak bole dibawa keluar rumah..tetapi streamyx adalah yang terbaik..berbanding BROADBAND2 lain..jadi fikir2kan la ye..
Monday, February 07, 2011
New Laptop Warranty
Kalo ader yang mahu membeli laptop baru pastikan la menambah warranty kepada 3 tahun..biar kita tambah duit sedikit...tetapi mendapat manfaat jangka panjang...kerana sekarang ini memang banyak laptop yg akan rosak selepas habis warranty 1 tahun....jika laptop rosak sebelum habis warranty..TOLONG jangan bawa kepada mana2 kedai membaiki komputer...kerana takot kalo2 mereka membuka laptop itu pastinya akan merosakan warranty laptop itu...ini akan menyusahkan untuk menebus warranty itu...jika hantar ke kedai yg menjual laptop itu..mereka pastinya tidak akan cuba untuk membuka laptop itu...kerana mereka tahu servis center tidak akan melayan jika ader kesan laptop di buka pada warranty sticker...kalo perasan warranty sticker ada dibelakang laptop...mengikut brand laptop itu sendiri...jika warranty sticker itu ada kesan dibuka...maksudnya bekas di potong..di lubangkan..secara automatiknya warranty laptop itu akan hilang...walaupun mengambil 3 tahun warranty sekali pun..jika ada bekas terkoyak..laptop itu sudah dikira tidak ada warranty lagi...jadi sebaik2nya hantar la terus laptop itu ke servis center@high point.....mengikut brand laptop anda...kerana jika anda hantar laptop itu ke kedai yang anda beli..mereka juga akan menghantar laptop itu ke servis center...
Thursday, January 13, 2011
INSTALL MICROSOFT SECURITY ESSENTIALS (MSE)
Microsoft Security Essentials (MSE) is a no-cost security software for your PC from Microsoft. It can provide protection against all kinds of malware including viruses, trojans, worms and spyware. Unlike other free software, this also provides real-time protection. One can get an idea of what to expect from Microsoft Security Essentials from our earlier article Microsoft Security Essentials – What you need to know?.
Download
Microsoft Security Essentials is available in many languages for Genuine Windows XP 32-bit, Windows Vista/WIN7 32-bit and for Windows Vista/WIN7 64-bit.
Installation

Double click the downloaded setup file to start the installation.
Click Next to continue.
Read the license agreement and then click I accept to accept the MSE license agreement. You can also read the license agreement on the web at MICROSOFT SOFTWARE LICENSE TERMS MICROSOFT SECURITY ESSENTIALS.
Microsoft Security Essentials needs to validate your copy of Windows prior to installation. Click Validate to start the validation process.
Once the validation is complete, click Install to continue with the installation.
 |  |
The following screen is displayed once the installation is complete:
Note that the option to download the latest updates and start a scan for potential threats is pre-checked. Click Finish.
 |  |
MSE will immediately search for and download the latest virus and spyware definitions and will commence a quick scan of the PC.
To upgrade MSE
Once the initial update and quick scan are completed, its time to look for any upgrades available for the MSE software itself.
 |  |
Expand “Additional help options” and click on Upgrade Microsoft Security Essentials. If an upgrade is available, let MSE download and install it.
WINDOWS XP SERVICE PACK 3
Windows XP Service Pack 3 (SP3) is an important update that includes previously released security, performance, and stability updates for Windows XP.
How to get SP3
The recommended (and easiest) way to get SP3 is to turn on Automatic Updates, which can automatically download SP3 when it's available for your computer. You just need a few clicks to begin the installation and the rest of the process is automatic. If Automatic Updates isn't turned on, you can install SP3 by using Windows Update at the Windowswebsite.
In order to install SP3, you must first have Windows XP Service Pack 1a (SP1a) or Service Pack 2 (SP2) installed. These are also available when you have Automatic Updates turned on. For more information about these and other Windows service packs, go to the Service Pack Center.
To learn if Windows XP SP3 is already installed
- Click Start, right-click My Computer, and then click Properties.If Service Pack 3 is listed in the System section, SP3 is already installed on your computer and you don't need to follow the instructions below.Before you install SP3, we recommend you do the following:
- Log on to your computer using an administrator account, make sure all other users are logged off of the computer, and close all open programs.
- Back up your important files to an external location, such as an external hard disk, DVD or CD, or USB flash drive. For more information, see "Backing up files and folders" in Help and Support Center.
- If you're using a laptop computer, connect it to an AC electrical outlet and don't unplug or restart the computer during installation.
- If you have a third-party wireless network adapter, make sure that the device is supported by Windows XP SP3. For more information, go to the device manufacturer's website.
- If your computer is running Windows XP Professional, we recommend that you create an Automated System Recovery (ASR) set. This can help repair your system if the installation fails. For more information, see "To create an Automated System Recovery set using Backup" in Help and Support Center. (ASR isn't available forWindows XP Home Edition.)
- Some antivirus software might prevent SP3 from installing, or might slow down the installation. You can try temporarily disabling your antivirus software. If you do so, be sure that you're aware of the risks involved, and be sure to enable it after the service pack is installed.
- Make sure you have enough free disk space to install SP3 (even though much of that space will be reclaimed after the installation). If you need to create free disk space, see "Using Disk Cleanup" in Help and Support Center.Amount of free disk space required to install SP3 (estimated):Installation methodApproximate free disk space requiredWindows Update1,840 MBDownloading SP3 from the Microsoftwebsite1,500 MBInstalling SP3 from a CD1,765 MB
Installing SP3 using Windows Update (recommended) If your computer is set to automatically install updates, you'll be prompted by Automatic Updates to install SP3. Follow the instructions on the screen. If you aren't prompted to install SP3, follow these steps:To install SP3 using Windows Update
- Click Start, click All Programs, and then click Windows Update.
- Click Express (Recommended).
- If your computer is up to date, Windows XP SP3 will be one of the updates that is automatically selected. Click Install Updates. If your computer isn't up to date,Windows Update will offer some other updates that you have to install first. Install those, and then repeat steps 1 and 2 to obtain Windows XP SP3.
- Follow the instructions that appear on your screen.
- After the installation is complete, click Finish to restart your computer.
- If you disabled your antivirus software, enable it again.
Manually installing SP3 using the Microsoft Download Center or a CD If you have problems obtaining the service pack from Windows Update, you can download SP3 as a standalone installation package from the Microsoft Download Center website, and then install SP3 manually. The installation package is intended for IT professionals and developers, but you can still download and install this file.You can also order a CD from Microsoft containing SP3. For more information, go to the Microsoft website.To manually install SP3 using the standalone installation package or a CD
- Do one of the following:
- If you downloaded SP3 from the website, to install it immediately, click Openor Run and follow the instructions on your screen. To install the program later, click Save and download the installation file to your computer. When you're ready to install the service pack, double-click the file.
- If you're installing SP3 from the Service Pack 3 CD, insert the disc into your computer with your current version of Windows XP running, and theSoftware Update Installation Wizard should automatically appear. If this wizard doesn't appear, click Start, double-click My Computer, right-click your CD or DVD drive, and then click AutoPlay.
- On the Windows XP Service Pack 3 page, click Next.
- Follow the instructions that appear on your screen.
- After the installation is complete, click Finish to restart your computer.
- If you disabled your antivirus software, enable it again.
Uninstalling SP3 If you installed SP3 yourself, you can uninstall it. However, if your computer came with SP3 already installed, it can't be uninstalled.To uninstall SP3
- Click Start, and then click Control Panel.
- Click Add or Remove Programs, click Windows XP Service Pack 3, and then clickRemove.
- Follow the instructions that appear on your screen.

Warning
If you choose to uninstall SP3, a dialog box displays a list of the programs that you installed after you installed SP3. If you continue, these programs might not work correctly.Help stay safe and keep your computer up to date Make sure you're taking advantage of all the ways that Windows can help keep your computer as secure and safe as possible:- Install an antivirus program. Antivirus programs scan for viruses trying to get into your e‑mail, operating system, or files, and can help protect your computer. To find an antivirus program, go to the Windows Security software providerswebpage on the Microsoft website.
- Don't open e‑mail attachments. Many viruses are attached to e‑mail messages and will spread as soon as you open the e‑mail attachment. It's best not to open any attachment unless it's something you're expecting. Microsoft Outlook andWindows Mail can help block potentially dangerous attachments.
- Use a firewall. Windows Firewall or any other firewall program can help alert you to security threats. It can block viruses, worms, and hackers from attempting to download potentially harmful programs onto your computer.
- Use the latest version of Internet Explorer. Internet Explorer 8 contains security and privacy improvements, such as SmartScreen Filter and InPrivate Browsing, which can help protect your computer so you can browse the web with more confidence. For more information, go to the Internet Explorer webpage on theWindows website.
Labels:
win xp,
win xp service pack 3..sp3
Wednesday, January 12, 2011
HOW TO FORMAT AND REINSTALL WINDOWS 7
STEP INSTALLATION
 Windows 7 is far better than previous windows versions (XP and Vista). The install process is plain simple and easy to follow. Big Bravo! for Microsoft for this. Now, just follow these steps and you will install windows 7 in no time
You can Install Windows 7 via DVD Disk you’ve purchased or with bootable USB.
This post explains installing windows 7 with dvd disk.
- 31 steps total, every step is screen-captured
First, insert your Windows 7 Boot Disk into your dvd drive and reboot your PC
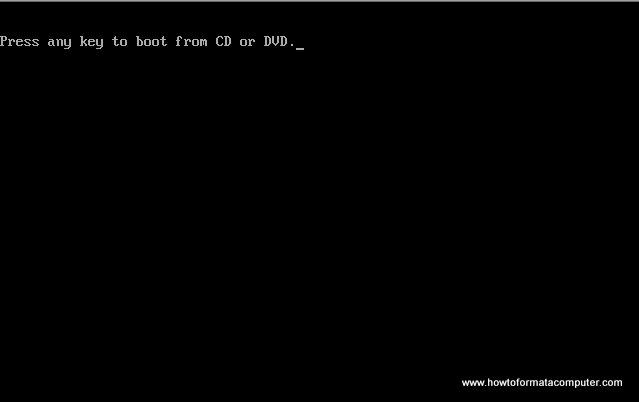
While the PC is rebooting, you will be prompted ” Press any key to boot from CD…” Just press any key here
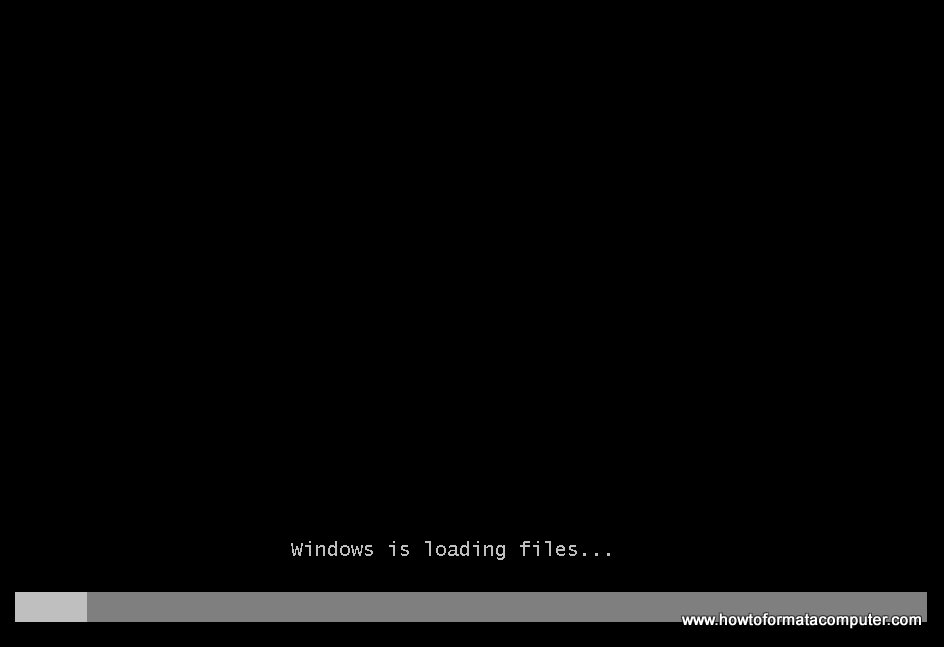
After you press a key, windows will load installation files.
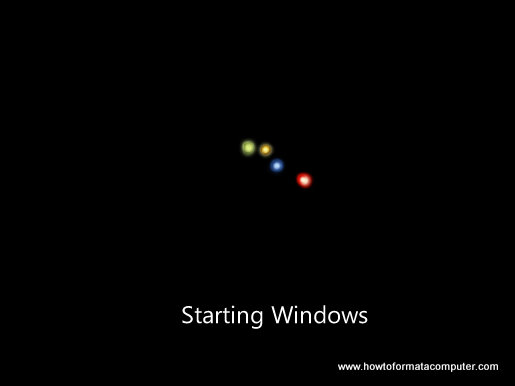
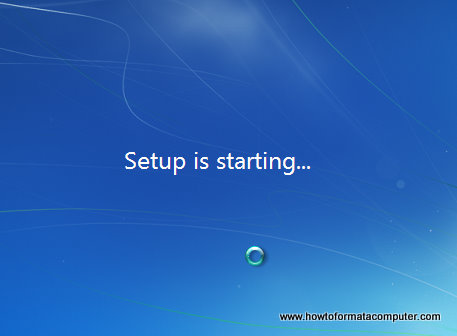
Windows 7 setup will start
Select your language, time and currency format and keyboard input (US)
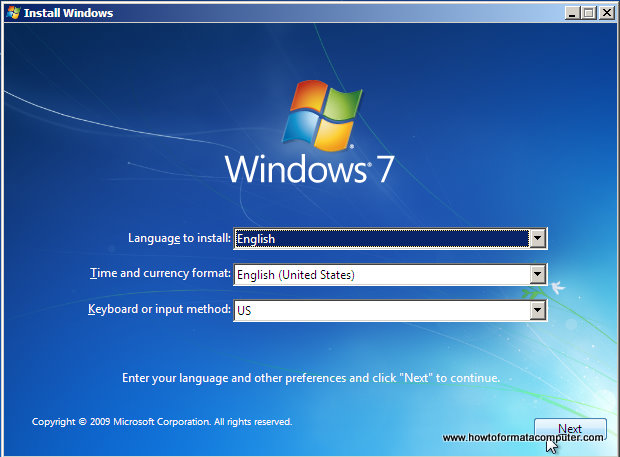
Install Windows 7 - First Setup Screen, input language, time and currency format and keyboard input method
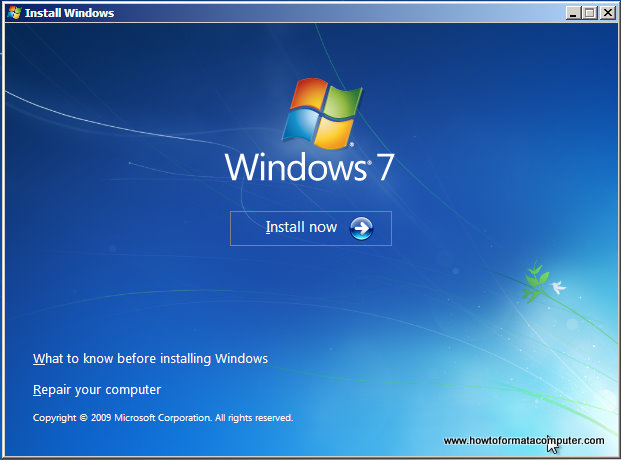
Click Install Now to proceed
Setup will load for a min or two
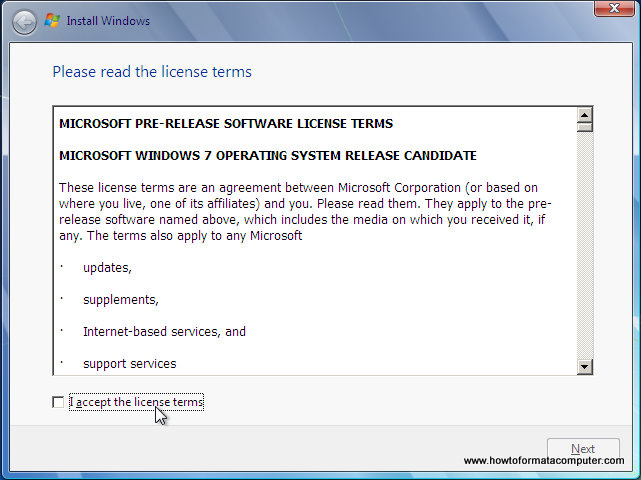
If you do, select I accept the license terms and click Next
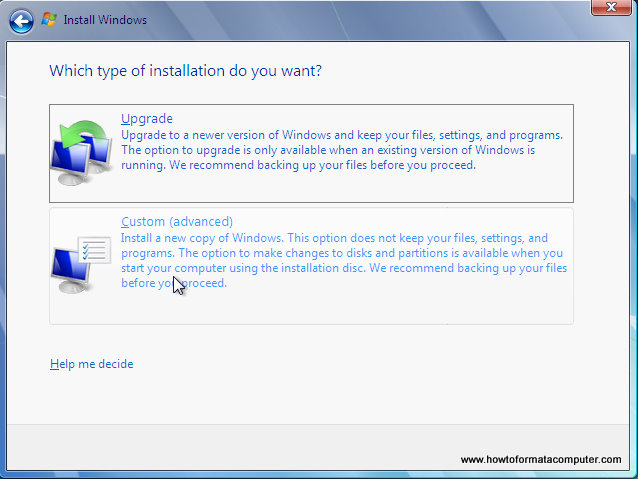
If you are upgrading from Windows Vista select Upgrade, if you had Windows XP you have to select Custom (Advanced). Upgrade from Windows XP to Windows 7 is not available. Click Custom (Advanced)
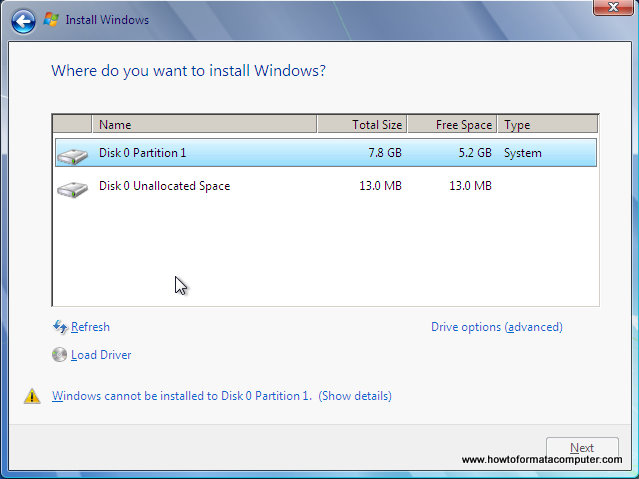
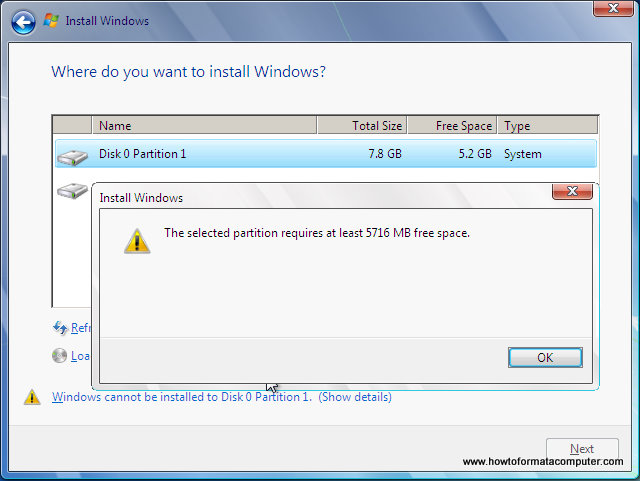
Select the Partition where you want to install Windows 7 and click Next. You will need at least 5716mb free space.
If you don’t have enough free space to Install Windows 7, you will receive the following warning
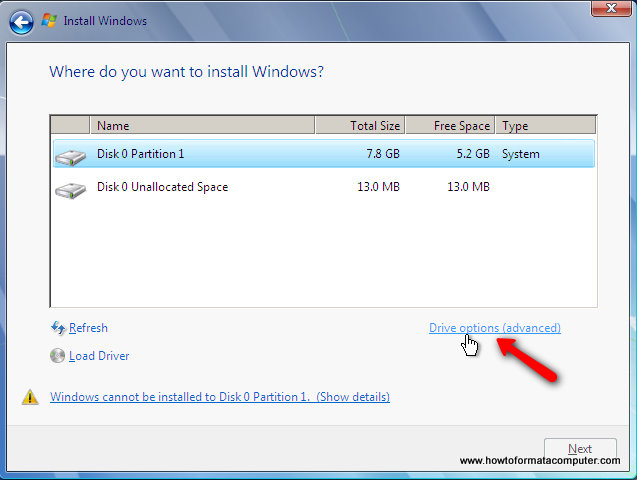
If that’s the case, you will need to format the partition where you previously had Operating System installed. WARNING: Formatting a partition will erase all existing data on the partition, proceed only if you have backed up all your files!
If you want to format the partition, go to Drive options
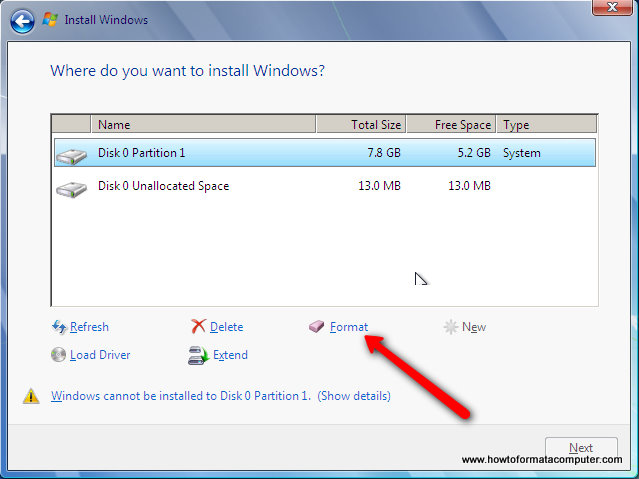
and format the partition where you want to install windows 7. Again, do this only if you have backed up your documents/files!
click format and then yes
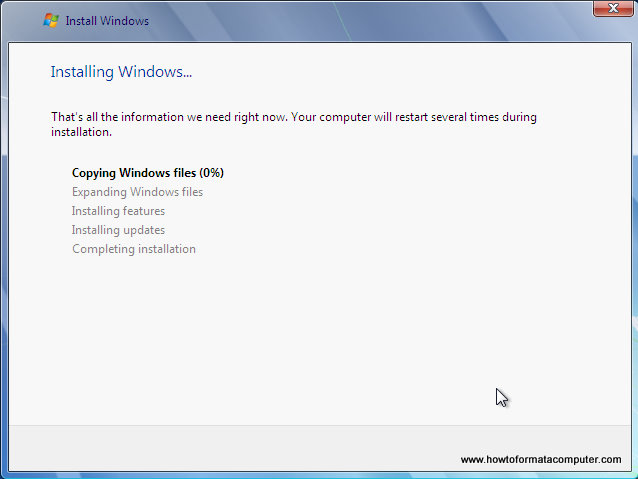
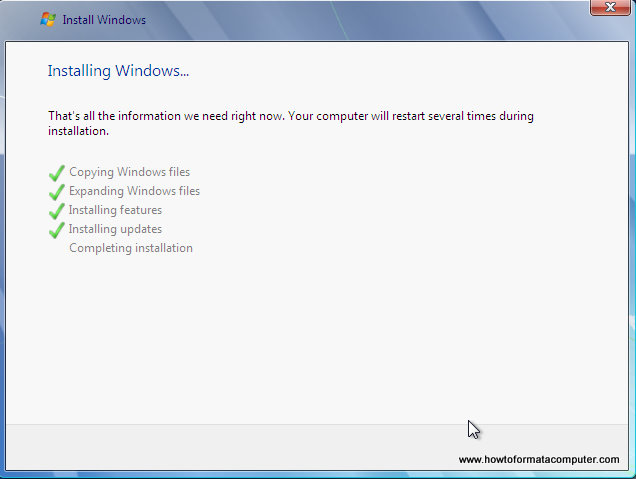
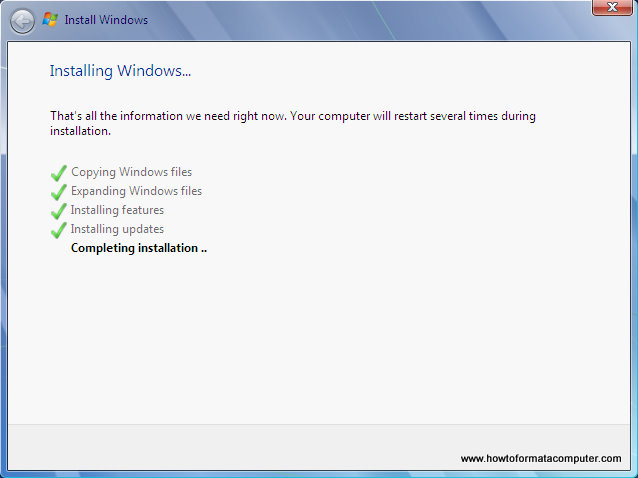
After you press Next, Windows 7 Installation will begin. Approximately takes about 30 min to 1 hour to finish, depending on your computer speed.
After half an hour, setup is complete and windows 7 installation is almost finished. Few more minutes
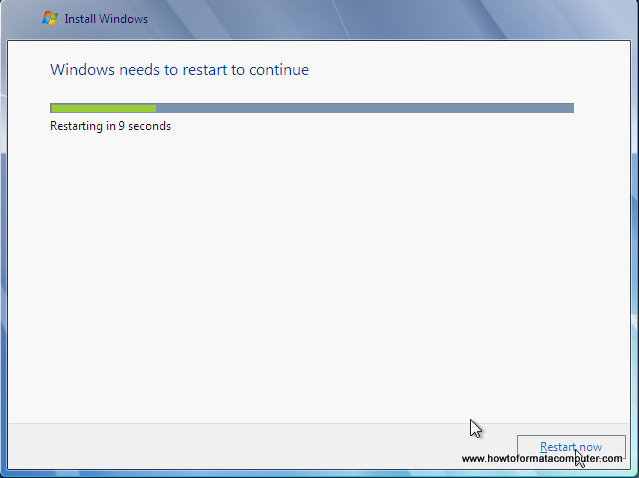
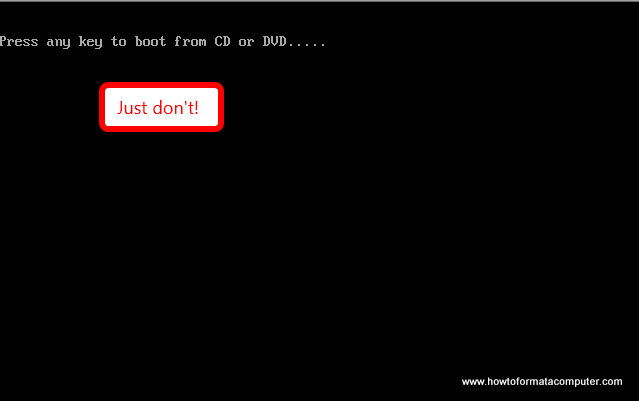
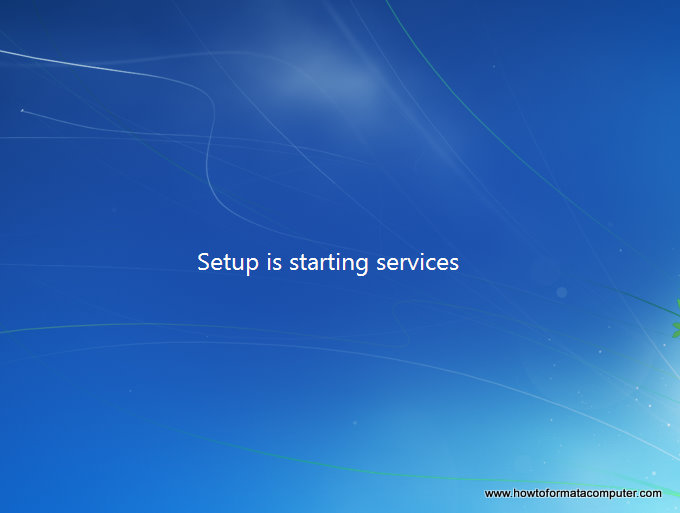
Now your computer will reboot, since the Windows 7 DVD boot disk is still in the drive, the message press any key to boot from DVD will appear. We already did that, so this time DO NOT press anything. Just wait 5 sec and your PC will continue booting and finish installing your operating system.
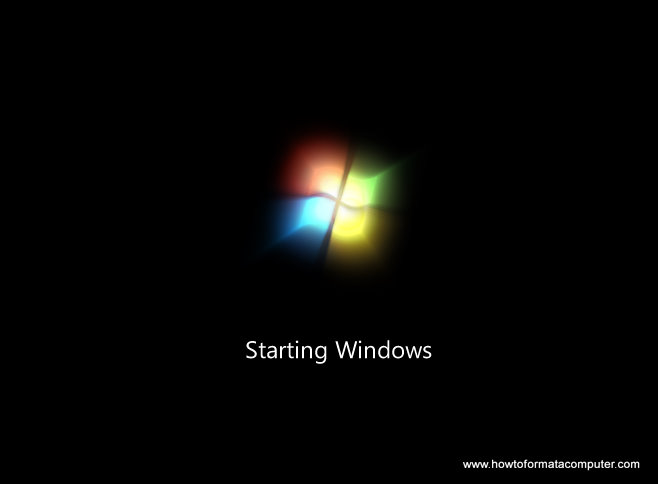
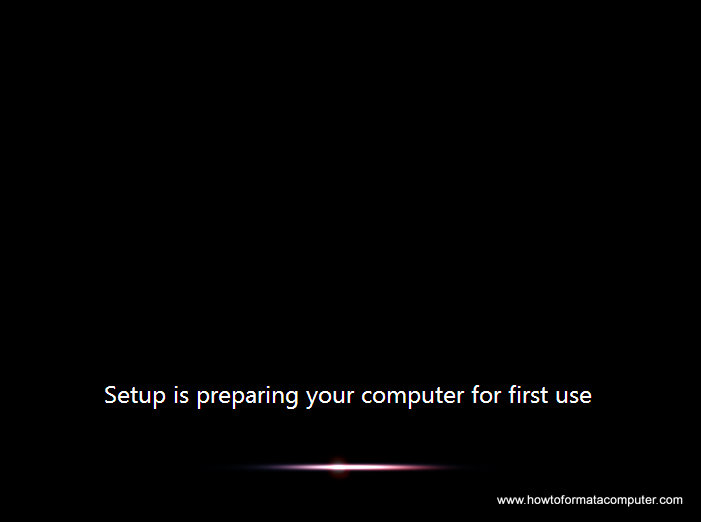
Windows will continue booting and installing, almost there!
Finally!
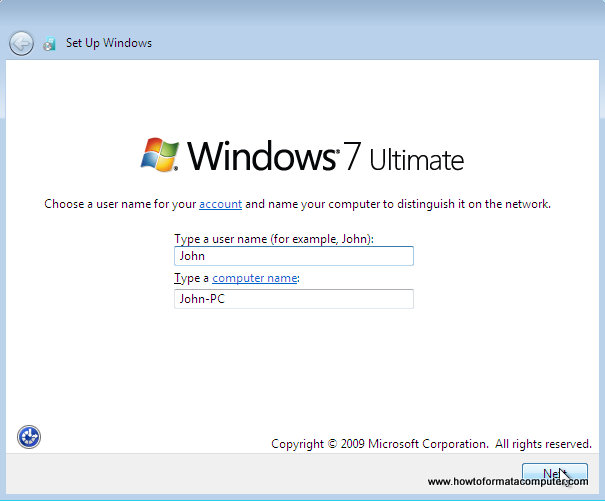
Insert your name (this will be your windows username)
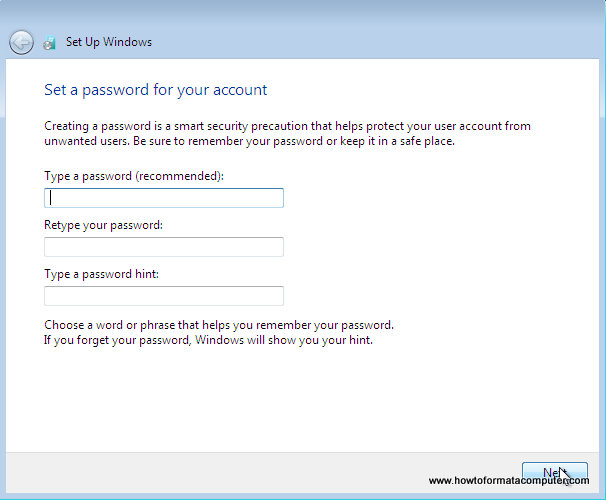
If you want to, insert password for your computer. ( Hey….you won’t forget it, right? :) )
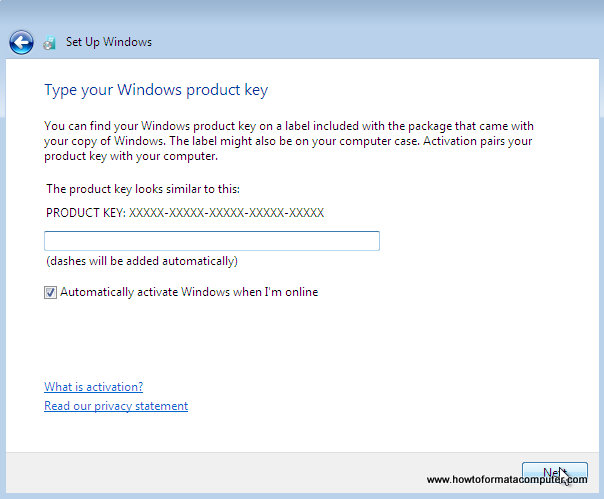
Insert your Windows 7 product key and press Next
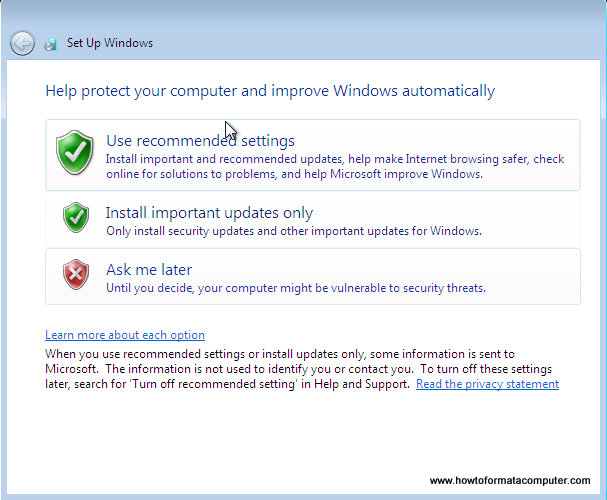
Do you want Microsoft Updates for your new operating system? It is highly recommend you know…! Select use recommended settings
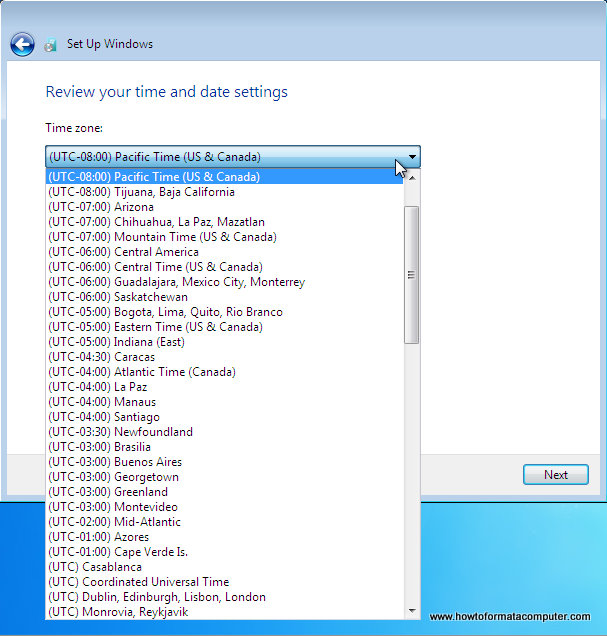
It’s time for Time zone, select yours from the drop down menu
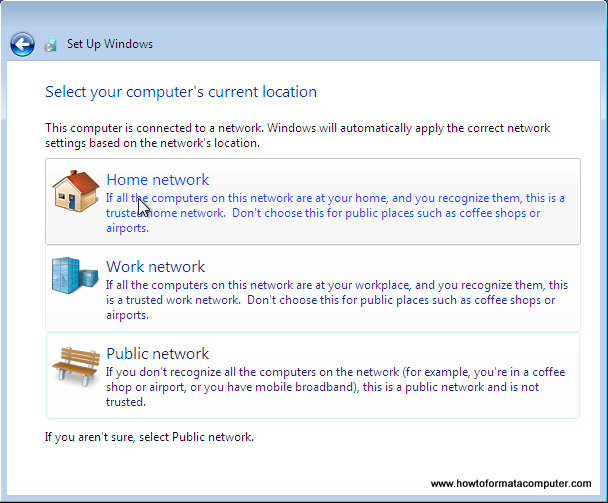
Depending on your location, select the appropriate network location.
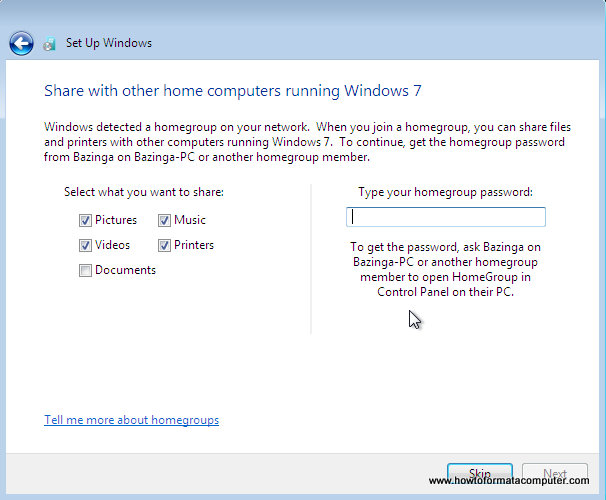
If you have more than 1 computer, type homegroup password for sharing files. Make sure to remember it
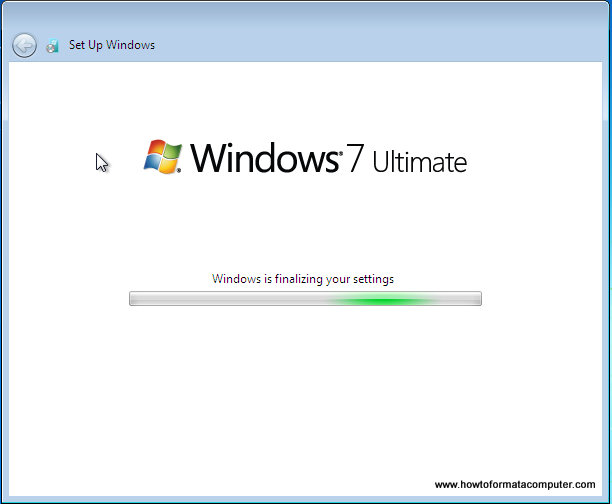
Windows is finalizing your settings
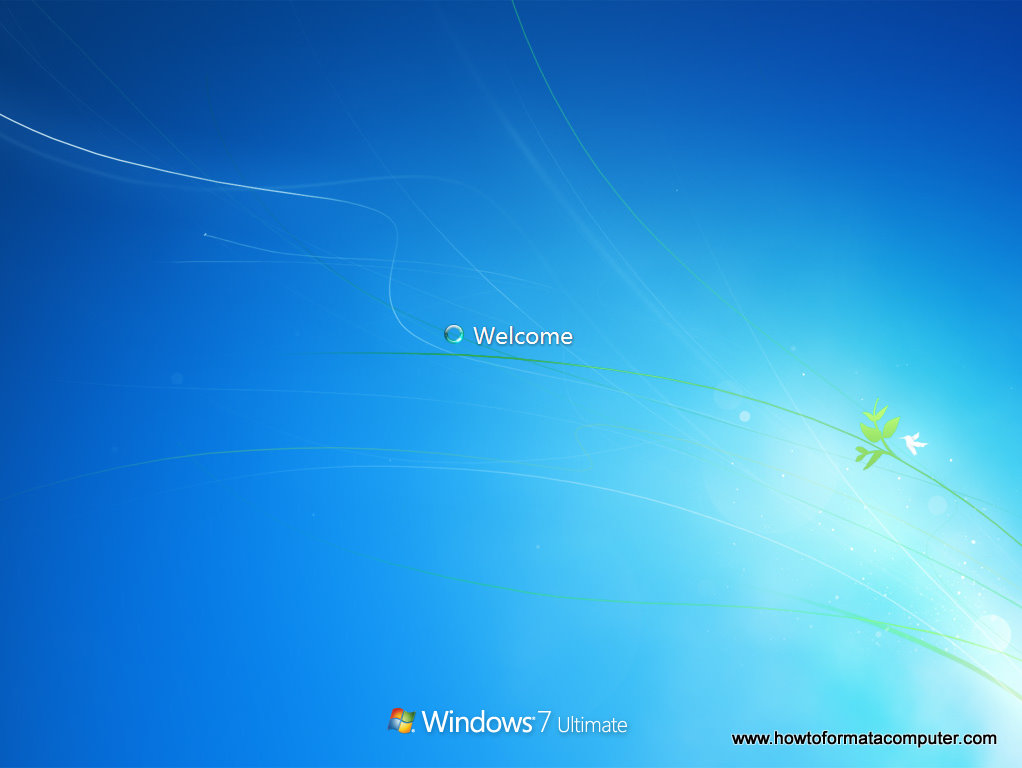
Can you see the finish line ? Yup, we’re there
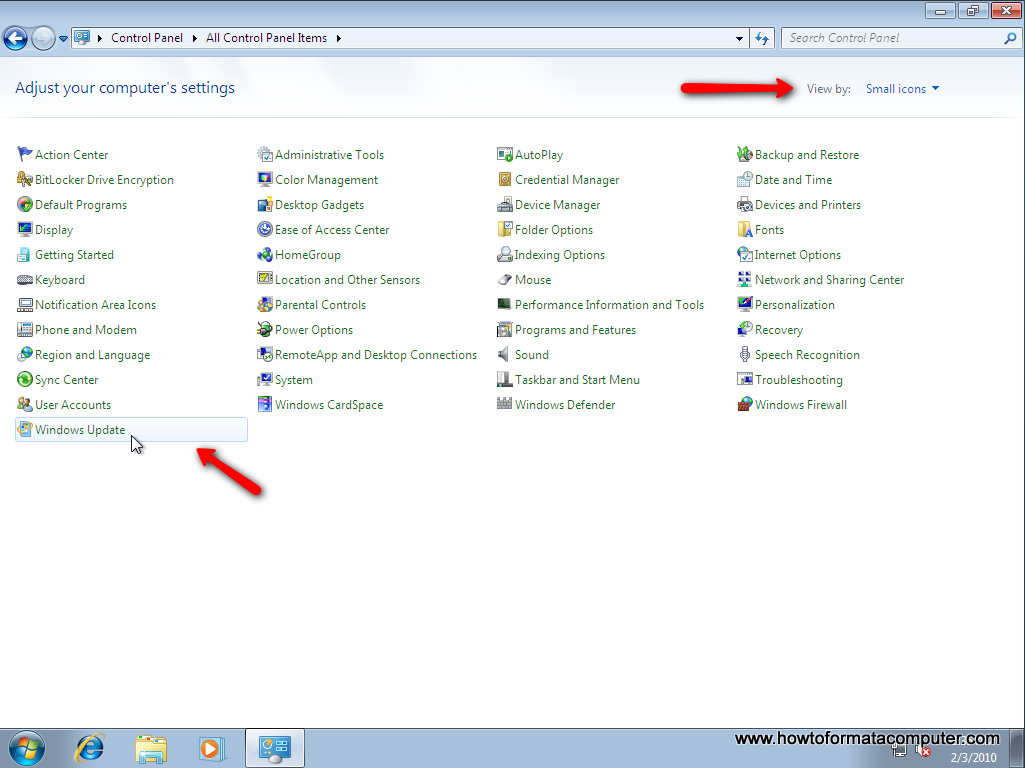
That’s it. Now insert your computer manufacturer drivers CD and install drivers. Also FYI, Windows 7 has great driver support, go to Start –> Control Panel –> Select View By = Small Icons –> Click Windows Update
Check for updates and click on optional updates, to see which drivers windows 7 found for your computer automatically.
Labels:
install win 7,
step format,
win 7
Subscribe to:
Posts (Atom)


